资源池化POC性能测试指南
内容简介
本章节主要介绍资源池化架构下TPCC的极限性能的测试方法,以及为达到最佳tpmC性能所依赖的相关GUC参数调优和OS调优。
硬件环境
- 计算 目前最佳TPCC结果是使用2个2路鲲鹏服务器(128C, 512G-1024G内存) OS版本为openEuler 20.03 LTS
- 存储 使用企业集中式存储,目前通过验证的硬件型号为OceanStor Dorado 5300/5500/18000/16000 V6系列
- 网络 鲲鹏配套的Hi1822(如果使用ROCE网络,网卡当前仅支持Mellox CX5)
软件环境
数据库:openGauss 5.0.1 正式发布版本
TPCC客户端:使用tidb优化过的BenchmarkSQL 5.0(https://github.com/pingcap/benchmarksql)
依赖包
所需软件 建议版本 numactl – jdk 1.8.0-242 ant 1.10.5 htop –
主机BIOS和OS部分调优
主机BIOS参数设置
- BIOS>Advanced>MISC Config,配置Support Smmu为Disabled
- BIOS>Advanced>MISC Config,配置CPU Prefetching Configuration为Disabled
- BIOS>Advanced>Memory Config,配置Die Interleaving为Disable
- BIOS>Advanced>Performance Config,配置Power Policy为Performance
操作系统优化
修改操作系统内核PAGESIZE为64KB(默认值)
关闭irqbalance
systemctl stop irqbalance调整numa_balance
echo 0 > /proc/sys/kernel/numa_balancing调整透明大页
echo 'never' > /sys/kernel/mm/transparent_hugepage/enabled
echo 'never' > /sys/kernel/mm/transparent_hugepage/defrag
网络配置
网络平面说明
一般情况下,数据库集群的网络可以分为3个平面:存储网络,计算节点间网络,业务侧网络
- 存储网络:计算节点与磁阵之间连接的网络,建议网卡带宽不低于10GE
- 计算网络:计算节点之间连接的网络,建议网卡带宽不低于10GE
- 业务侧网络:计算节点与业务客户端(或TPCC压测客户端)的网络,建议网卡带宽不低于10GE
性能测试场景下,需要对存储网络使用的网卡进行中断绑定CPU核的设置(因为存储IO流量最大,如果是主备同时压测,那么计算网络也会有一定的流量),计算网络可以按需要设置 如果网卡配置中使用了BOND或者VxLAN,需要对实际的物理网卡做中断绑定CPU核的设置 如果部分网络平面重合,比如存储网络和计算网络共用,或者计算网络和业务侧网络共用,那么也需要对实际的物理网卡做中断绑定CPU核的设置
网卡多中断队列设置
##此处enp4s0为存储网络的物理网卡
[root@localhost]# ethtool -L enp4s0 combined 16
中断调优开启tso,lro,gro,gso特性。
ethtool -K enp4s0 tso on
ethtool -K enp4s0 lro on
ethtool -K enp4s0 gro on
ethtool -K enp4s0 gso on
网卡固件确认与更新
[root@localhost]# ethtool -i enp4s0
driver: hinic
version: 2.3.2.11
firmware-version: 2.4.1.0
expansion-rom-version:
bus-info: 0000:04:00.0
supports-statistics: yes
supports-test: yes
supports-eeprom-access: no
supports-register-dump: no
supports-priv-flags: no
网卡固件版本应为2.4.1.0
安装数据库
安装一主一备openGauss资源池化环境。参考资源池化OM安装部署。
磁盘IO队列调度机制设置
针对磁盘IO队列调度机制设置,此处的sb*表示使用的磁阵的LUN映射在主机侧的块设备盘符。由于安装过程中OM会修改该配置,所以需要在安装完成后执行。
echo none > /sys/block/sb*/queue/scheduler
网卡中断绑核
首先获取网卡对应的中断号
[root@localhost]# cat /proc/interrupts | grep enp4s0 | awk '{print $1$NF}'
405:enp4s0_qp0
406:enp4s0_qp1
407:enp4s0_qp2
408:enp4s0_qp3
409:enp4s0_qp4
410:enp4s0_qp5
411:enp4s0_qp6
412:enp4s0_qp7
413:enp4s0_qp8
414:enp4s0_qp9
415:enp4s0_qp10
416:enp4s0_qp11
417:enp4s0_qp12
418:enp4s0_qp13
419:enp4s0_qp14
420:enp4s0_qp15
绑定对应的CPU核
[root@localhost]# echo 28 >  /proc/irq/405/smp_affinity_list
[root@localhost]# echo 29 >  /proc/irq/406/smp_affinity_list
[root@localhost]# echo 30 >  /proc/irq/407/smp_affinity_list
[root@localhost]# echo 31 >  /proc/irq/408/smp_affinity_list
[root@localhost]# echo 60 >  /proc/irq/409/smp_affinity_list
[root@localhost]# echo 61 >  /proc/irq/410/smp_affinity_list
[root@localhost]# echo 62 >  /proc/irq/411/smp_affinity_list
[root@localhost]# echo 63 >  /proc/irq/412/smp_affinity_list
[root@localhost]# echo 92 >  /proc/irq/413/smp_affinity_list
[root@localhost]# echo 93 >  /proc/irq/414/smp_affinity_list
[root@localhost]# echo 94 >  /proc/irq/415/smp_affinity_list
[root@localhost]# echo 95 >  /proc/irq/416/smp_affinity_list
[root@localhost]# echo 124 > /proc/irq/417/smp_affinity_list
[root@localhost]# echo 125 > /proc/irq/418/smp_affinity_list
[root@localhost]# echo 126 > /proc/irq/419/smp_affinity_list
[root@localhost]# echo 127 > /proc/irq/420/smp_affinity_list
准备测试工具
准备TPCC测试客户端
下载TPCC标准测试工具BenchmarkSQL5.0。
[root@localhost]# git clone -b 5.0-mysql-support-opt-2.1 https://github.com/pingcap/benchmarksql.git
Cloning into 'tpcc-mysql'...
remote: Enumerating objects: 106, done.
remote: Total 106 (delta 0), reused 0 (delta 0), pack-reused 106
Receiving objects: 100% (106/106), 64.46 KiB | 225.00 KiB/s, done.
Resolving deltas: 100% (30/30), done.
下载安装JDK和ant依赖包。
[root@localhost]# rpm -ivh ant-1.10.5-6.oe1.noarch.rpm jdk-8u281-linux-aarch64.rpm --force --nodeps
warning: ant-1.10.5-6.oe1.noarch.rpm: Header V3 RSA/SHA1 Signature, key ID b25e7f66: NOKEY
warning: jdk-8u281-linux-aarch64.rpm: Header V3 RSA/SHA256 Signature, key ID ec551f03: NOKEY
Verifying...                          ################################# [100%]
Preparing...                          ################################# [100%]
Updating / installing...
   1:jdk1.8-2000:1.8.0_281-fcs        ################################# [ 50%]
Unpacking JAR files...
        tools.jar...
        rt.jar...
        jsse.jar...
        charsets.jar...
        localedata.jar...
   2:ant-0:1.10.5-6.oe1               ################################# [100%]
配置JAVA环境变量
[root@localhost]# tail -3  /root/.bashrc
export JAVA_HOME=/usr/java/jdk1.8.0_281-aarch64
export PATH=$JAVA_HOME/bin:$PATH
export CLASSPATH=.:JAVA_HOME/lib:$BENCHMARKSQLPATH/run/ojdbc7.jar
在BenchmarkSQL所在目录下输入ant命令进行编译,编译成功后会生成build和dist两个目录。
[root@localhost]# pwd /tmp/benchmarksql-5.0-mysql-support-opt-2.1 [root@localhost]# ant Buildfile: /tmp/benchmarksql-5.0-mysql-support-opt-2.1/build.xml init: [mkdir] Created dir: /tmp/benchmarksql-5.0-mysql-support-opt-2.1/build compile: [javac] Compiling 12 source files to /tmp/benchmarksql-5.0-mysql-support-opt-2.1/build dist: [mkdir] Created dir: /tmp/benchmarksql-5.0-mysql-support-opt-2.1/dist [jar] Building jar: /tmp/benchmarksql-5.0-mysql-support-opt-2.1/dist/BenchmarkSQL-5.0.jar BUILD SUCCESSFUL Total time: 1 second下载对应的JDBC驱动至BenchmarkSQL目录的lib/postgresql文件夹,并解压,删除自带的JDBC驱动。
[root@localhost]# pwd
/tmp/benchmarksql-5.0-mysql-support-opt-2.1/lib/postgres/
[root@localhost]# ls
openGauss-5.1.0-JDBC.tar.gz  postgresql-9.3-1102.jdbc41.jar
[root@localhost]# rm -f postgresql-9.3-1102.jdbc41.jar
[root@localhost]# tar -xf openGauss-5.1.0-JDBC.tar.gz
[root@localhost]# ls
openGauss-5.1.0-JDBC.tar.gz  postgresql.jar
调整性能测试相关配置
连接串
conn=jdbc:opengauss://20.0.0.103:26000/tpcc?prepareThreshold=1&batchMode=on&fetchsize=10&loggerLevel=off修改文件内容将数据分散,调整FILLFACTOR,数据分区。
[root@localhost]# ls benchmarksql-5.0-mysql-support-opt-2.1/run/sql.common/tableCreates.sql
benchmarksql-5.0-mysql-support-opt-2.1/run/sql.common/tableCreates.sql
[root@localhost]# cat tableCreates.sql
CREATE TABLESPACE example2 relative location 'tablespace2';
CREATE TABLESPACE example3 relative location 'tablespace3';

create table bmsql_config (
  cfg_name    varchar(30),
  cfg_value   varchar(50)
);

create table bmsql_warehouse (
  w_id        integer   not null,
  w_ytd       decimal(12,2),
  w_tax       decimal(4,4),
  w_name      varchar(10),
  w_street_1  varchar(20),
  w_street_2  varchar(20),
  w_city      varchar(20),
  w_state     char(2),
  w_zip       char(9)
) WITH (FILLFACTOR=80);

create table bmsql_district (
 d_w_id       integer       not null,
 d_id         integer       not null,
 d_ytd        decimal(12,2),
 d_tax        decimal(4,4),
 d_next_o_id  integer,
 d_name       varchar(10),
 d_street_1   varchar(20),
 d_street_2   varchar(20),
 d_city       varchar(20),
 d_state      char(2),
 d_zip        char(9)
) WITH (FILLFACTOR=80);

create table bmsql_customer (
 c_w_id         integer        not null,
 c_d_id         integer        not null,
 c_id           integer        not null,
 c_discount     decimal(4,4),
 c_credit       char(2),
 c_last         varchar(16),
 c_first        varchar(16),
 c_credit_lim   decimal(12,2),
 c_balance      decimal(12,2),
 c_ytd_payment  decimal(12,2),
 c_payment_cnt  integer,
 c_delivery_cnt integer,
 c_street_1     varchar(20),
 c_street_2     varchar(20),
 c_city         varchar(20),
 c_state        char(2),
 c_zip          char(9),
 c_phone        char(16),
 c_since        timestamp,
 c_middle       char(2),
 c_data         varchar(500)
) WITH (FILLFACTOR=80) tablespace example2;

create sequence bmsql_hist_id_seq;

create table bmsql_history (
 hist_id  integer,
 h_c_id   integer,
 h_c_d_id integer,
 h_c_w_id integer,
 h_d_id   integer,
 h_w_id   integer,
 h_date   timestamp,
 h_amount decimal(6,2),
 h_data   varchar(24)
) WITH (FILLFACTOR=80);

create table bmsql_new_order (
 no_w_id  integer   not null,
 no_d_id  integer   not null,
 no_o_id  integer   not null
) WITH (FILLFACTOR=80);

create table bmsql_oorder (
 o_w_id       integer      not null,
 o_d_id       integer      not null,
 o_id         integer      not null,
 o_c_id       integer,
 o_carrier_id integer,
 o_ol_cnt     integer,
 o_all_local  integer,
 o_entry_d    timestamp
) WITH (FILLFACTOR=80);

create table bmsql_order_line (
 ol_w_id         integer   not null,
 ol_d_id         integer   not null,
 ol_o_id         integer   not null,
 ol_number       integer   not null,
 ol_i_id         integer   not null,
 ol_delivery_d   timestamp,
 ol_amount       decimal(6,2),
 ol_supply_w_id  integer,
 ol_quantity     integer,
 ol_dist_info    char(24)
) WITH (FILLFACTOR=80);

create table bmsql_item (
 i_id     integer      not null,
 i_name   varchar(24),
 i_price  decimal(5,2),
 i_data   varchar(50),
 i_im_id  integer
);

create table bmsql_stock (
 s_w_id       integer       not null,
 s_i_id       integer       not null,
 s_quantity   integer,
 s_ytd        integer,
 s_order_cnt  integer,
 s_remote_cnt integer,
 s_data       varchar(50),
 s_dist_01    char(24),
 s_dist_02    char(24),
 s_dist_03    char(24),
 s_dist_04    char(24),
 s_dist_05    char(24),
 s_dist_06    char(24),
 s_dist_07    char(24),
 s_dist_08    char(24),
 s_dist_09    char(24),
 s_dist_10    char(24)
) WITH (FILLFACTOR=80) tablespace example3;
准备sysbench客户端
下载sysbench测试工具。
[root@localhost]# git clone https://gitee.com/mirrors/sysbench.git切换到1.0.18分支,然后执行编译。
[root@localhost]# cd sysbench
[root@localhost]# git checkout 1.0.18 -b test_1.0.18
[root@localhost]# ./autogen.sh
##如果configure命令报错,需要根据报错信息安装相应的三方依赖,一般情况下使用yum install postgresql-devel和yum install postgresql-libs即可
[root@localhost]# ./configure --without-mysql --with-pgsql
[root@localhost]# make -sj
[root@localhost]# make install -sj
计算节点数据库进程绑核
计算节点上安装numactl
yum install numactl -y计算节点数据库进程绑核 关闭集群
[omm@localhost]$ cm_ctl stop替换启动数据库节点命令:
## $GAUSSHOME为数据库二进制安装的目录
[omm@localhost]$ sed -i 's/nohup/nohup numactl -C 1-28,32-60,64-92,96-124/' $GAUSSHOME/bin/dms_contrl.sh
设置性能测试数据库参数(极限性能测试使用)
- 切换到数据库安装用户下面执行如下命令
gs_guc set -N all -I all -h "host all all  0.0.0.0/0 sha256"
gs_guc set -N all -I all -c "listen_addresses ='*'"
gs_guc set -N all -I all -c "max_connections = 4096"
gs_guc set -N all -I all -c "remote_read_mode = non_authentication"
gs_guc set -N all -I all -c "allow_concurrent_tuple_update = true"
gs_guc set -N all -I all -c "audit_enabled = off"
gs_guc set -N all -I all -c "cstore_buffers = 16MB"
gs_guc set -N all -I all -c "enable_alarm = off"
gs_guc set -N all -I all -c "enable_codegen = false"
gs_guc set -N all -I all -c "enable_data_replicate = off"
gs_guc set -N all -I all -c "full_page_writes = off"
gs_guc set -N all -I all -c "max_files_per_process = 100000"
gs_guc set -N all -I all -c "max_prepared_transactions = 2048"
gs_guc set -N all -I all -c "max_process_memory = 500GB"
gs_guc set -N all -I all -c "shared_buffers = 300GB"
gs_guc set -N all -I all -c "use_workload_manager = off"
gs_guc set -N all -I all -c "wal_buffers = 1GB"
gs_guc set -N all -I all -c "work_mem = 1MB"
gs_guc set -N all -I all -c "transaction_isolation = 'read committed'"
gs_guc set -N all -I all -c "default_transaction_isolation = 'read committed'"
gs_guc set -N all -I all -c "synchronous_commit = on"
gs_guc set -N all -I all -c "fsync = on"
gs_guc set -N all -I all -c "maintenance_work_mem = 2GB"
gs_guc set -N all -I all -c "vacuum_cost_limit = 10000"
gs_guc set -N all -I all -c "autovacuum = on"
gs_guc set -N all -I all -c "autovacuum_mode = vacuum"
gs_guc set -N all -I all -c "autovacuum_max_workers = 20"
gs_guc set -N all -I all -c "autovacuum_naptime = 5s"
gs_guc set -N all -I all -c "autovacuum_vacuum_cost_delay = 10"
gs_guc set -N all -I all -c "update_lockwait_timeout = 20min"
gs_guc set -N all -I all -c "enable_mergejoin = off"
gs_guc set -N all -I all -c "enable_nestloop = off"
gs_guc set -N all -I all -c "enable_hashjoin = off"
gs_guc set -N all -I all -c "enable_material = off"
gs_guc set -N all -I all -c "wal_log_hints = off"
gs_guc set -N all -I all -c "log_duration = off"
gs_guc set -N all -I all -c "checkpoint_timeout = 15min"
gs_guc set -N all -I all -c "autovacuum_vacuum_scale_factor = 0.1"
gs_guc set -N all -I all -c "autovacuum_analyze_scale_factor = 0.02"
gs_guc set -N all -I all -c "enable_save_datachanged_timestamp = false"
gs_guc set -N all -I all -c "enable_double_write = on"
gs_guc set -N all -I all -c "enable_incremental_checkpoint = on"
gs_guc set -N all -I all -c "enable_opfusion = on"
gs_guc set -N all -I all -c "advance_xlog_file_num = 5"
gs_guc set -N all -I all -c "track_activities = off"
gs_guc set -N all -I all -c "enable_instr_track_wait = off"
gs_guc set -N all -I all -c "enable_instr_rt_percentile = off"
gs_guc set -N all -I all -c "track_counts = off"
gs_guc set -N all -I all -c "track_sql_count = off"
gs_guc set -N all -I all -c "enable_instr_cpu_timer = off"
gs_guc set -N all -I all -c "plog_merge_age = 0"
gs_guc set -N all -I all -c "session_timeout = 0"
gs_guc set -N all -I all -c "enable_instance_metric_persistent = off"
gs_guc set -N all -I all -c "enable_logical_io_statistics = off"
gs_guc set -N all -I all -c "enable_page_lsn_check = off"
gs_guc set -N all -I all -c "enable_user_metric_persistent = off"
gs_guc set -N all -I all -c "enable_xlog_prune = off"
gs_guc set -N all -I all -c "enable_resource_track = off"
gs_guc set -N all -I all -c "instr_unique_sql_count=0"
gs_guc set -N all -I all -c "remote_read_mode=non_authentication"
gs_guc set -N all -I all -c "wal_level = archive"
gs_guc set -N all -I all -c "hot_standby = off"
gs_guc set -N all -I all -c "hot_standby_feedback = off"
gs_guc set -N all -I all -c "client_min_messages = ERROR"
gs_guc set -N all -I all -c "log_min_messages = FATAL"
gs_guc set -N all -I all -c "enable_asp = off"
gs_guc set -N all -I all -c "enable_bbox_dump = off"
gs_guc set -N all -I all -c "bgwriter_flush_after = 32"
gs_guc set -N all -I all -c "wal_keep_segments = 1025"
gs_guc set -N all -I all -c "enable_bitmapscan = off"
gs_guc set -N all -I all -c "enable_seqscan = off"
gs_guc set -N all -I all -c "enable_beta_opfusion=on"
gs_guc set -N all -I all -c "checkpoint_segments=8000"
gs_guc set -N all -I all -c "enable_stmt_track=false"
gs_guc set -N all -I all -c "bgwriter_delay = 5s"
gs_guc set -N all -I all -c "incremental_checkpoint_timeout = 5min"
gs_guc set -N all -I all -c "xloginsert_locks = 16"
gs_guc set -N all -I all -c "walwriter_cpu_bind = 0"
gs_guc set -N all -I all -c "wal_file_init_num = 20"
gs_guc set -N all -I all -c "pagewriter_sleep = 5s"
gs_guc set -N all -I all -c "walwriter_sleep_threshold = 50000"
gs_guc set -N all -I all -c "gs_clean_timeout = 0"
gs_guc set -N all -I all -c "undo_zone_count = 0"
gs_guc set -N all -I all -c "pagewriter_thread_num = 4"
gs_guc set -N all -I all -c "max_redo_log_size = 400GB"
gs_guc set -N all -I all -c "max_io_capacity = 10GB"
gs_guc set -N all -I all -c "local_syscache_threshold = 32MB"
gs_guc set -N all -I all -c "segment_buffers = 1GB"
gs_guc set -N all -I all -c "numa_distribute_mode ='all'"
gs_guc set -N all -I all -c "enable_cachedplan_mgr = off"
gs_guc set -N all -I all -c "light_comm = on"
gs_guc set -N all -I all -c "enable_indexscan_optimization = on"
gs_guc set -N all -I all -c "ss_enable_ssl = off"
gs_guc set -N all -I all -c "ssl = off"
gs_guc set -N all -I all -c "ss_interconnect_channel_count = 32"
gs_guc set -N all -I all -c "ss_work_thread_count = 128"
gs_guc set -N all -I all -c "ss_recv_msg_pool_size = 1GB"
gs_guc set -N all -I all -c "enable_global_syscache = on"
创建测试数据库和用户
在主机侧创建数据库tpcc及用户tpcc。
[omm@localhost]$ gsql -d postgres -p 26000 -r
postgres=# create database tpcc;
CREATE DATABASE
postgres=# \q
[omm@localhost]$ gsql -d tpcc -p 26000 -r
tpcc=# CREATE USER tpcc WITH PASSWORD "tpcc@123";
CREATE ROLE
tpcc=# GRANT ALL ON schema public TO tpcc;
GRANT
tpcc=# ALTER User tpcc sysadmin;
ALTER ROLE
修改测试客户端配置
进入BenchmarkSQL目录下的run文件夹,编辑benchmarksql配置文件,修改测试参数,包括数据库用户名、密码、IP、端口、数据库。
[root@localhost]# cd /tmp/benchmarksql-5.0-mysql-support-opt-2.1/run
[root@localhost]# vim props.og
db=postgres
driver=org.opengauss.Driver
conn=jdbc:opengauss://20.20.20.103:26000/tpcc?prepareThreshold=1&batchMode=on&fetchsize=10&loggerLevel=off #修改连接字符串, 包含IP、端口号、数据库
user=tpcc #用户名
password=tpcc@123 #密码
warehouses=1000  #仓位数
terminals=600 #并发数
runMins=15  #运行时间
runTxnsPerTerminal=0
loadWorkers=100
limitTxnsPerMin=0
terminalWarehouseFixed=true
newOrderWeight=45
paymentWeight=43
orderStatusWeight=4
deliveryWeight=4
stockLevelWeight=4
导入测试数据
如果是TPCC测试,执行如下命令导入测试数据(TPCC测试)。
[root@localhost]# sh runDatabaseBuild.sh props.og
# ------------------------------------------------------------
# Loading SQL file ./sql.common/tableCreates.sql
# ------------------------------------------------------------
create table bmsql_config (
cfg_name    varchar(30) primary key,
cfg_value   varchar(50)
);
......
# ------------------------------------------------------------
# Loading SQL file ./sql.postgres/buildFinish.sql
# ------------------------------------------------------------
-- ----
-- Extra commands to run after the tables are created, loaded,
-- indexes built and extra's created.
-- PostgreSQL version.
-- ----
vacuum analyze;
如果是使用sysbench测试,执行如下命令导入测试数据(sysbench测试)。
##下述命令中使用的用户名为tpcc,数据库名称为tpcc,用户密码为tpcc@123,数据库端口为26000
[root@localhost]# sysbench --pgsql-password=tpcc@123 --pgsql-port=26000 --report-interval='1' --pgsql-host=20.20.20.103 --tables='8' --db-driver='pgsql' --events='0' --histogram='on' --percentile='95' --threads='512' --table-size='64000000' --time='1200' --pgsql-user=tpcc --rand-type='uniform' --pgsql-db=tpcc oltp_read_write prepare
执行测试
TPCC测试
- 执行如下命令开始测试。
[root@localhost]# sh runBenchmark.sh props.og - 为了避免多次测试导致数据量太大,影响性能,可以把数据清空重新开始。
[root@localhost]# sh runDatabaseDestroy.sh props.og # ------------------------------------------------------------ # Loading SQL file ./sql.common/tableDrops.sql # ------------------------------------------------------------ drop table bmsql_config; drop table bmsql_new_order; drop table bmsql_order_line; drop table bmsql_oorder; drop table bmsql_history; drop table bmsql_customer; drop table bmsql_stock; drop table bmsql_item; drop table bmsql_district; drop table bmsql_warehouse; drop sequence bmsql_hist_id_seq; - 如果调整配置后重新测试,或者复测,需要重新执行 Build / Run / Destroy。
- 执行如下命令开始测试。
sysbench测试
- 执行如下命令开始测试。
[root@localhost]# sysbench --pgsql-password=tpcc@123 --pgsql-port=26000 --report-interval='1' --pgsql-host=20.20.20.103 --tables='8' --db-driver='pgsql' --events='0' --histogram='on' --percentile='95' --threads='512' --table-size='64000000' --time='1200' --pgsql-user=tpcc --rand-type='uniform' --pgsql-db=tpcc oltp_read_write run - 为了避免多次测试导致数据量太大,影响性能,可以把数据清空重新开始。
[root@localhost]# sysbench --pgsql-password=tpcc@123 --pgsql-port=26000 --report-interval='1' --pgsql-host=20.20.20.103 --tables='8' --db-driver='pgsql' --events='0' --histogram='on' --percentile='95' --threads='512' --table-size='64000000' --time='1200' --pgsql-user=tpcc --rand-type='uniform' --pgsql-db=tpcc oltp_read_write cleanup - 如果调整配置后重新测试,或者复测,需要重新执行 prepare / run / cleanup。
- 执行如下命令开始测试。
主机读写加备机只读性能测试
上述步骤是测试单独压主机读写的测试,如果需要测试主机读写同时备机只读,需要新增一个数据库配置参数
gs_guc set -N all -I all -c ""ss_enable_bcast_snapshot = on"如果需要测试TPCC的主机读写同时备机只读,那么需要启动2个BenchmarkSQL分别对主机和备机进行压测
- 主机侧的BenchmarkSQL的测试配置如下(与只测试主机读写相同):
db=postgres driver=org.opengauss.Driver conn=jdbc:opengauss://20.20.20.103:26000/tpcc?prepareThreshold=1&batchMode=on&fetchsize=10&loggerLevel=off #修改连接字符串, 包含IP、端口号、数据库 user=tpcc #用户名 password=tpcc@123 #密码 warehouses=1000 #仓位数 terminals=600 #并发数 runMins=15 #运行时间 runTxnsPerTerminal=0 loadWorkers=100 limitTxnsPerMin=0 terminalWarehouseFixed=true newOrderWeight=45 paymentWeight=43 orderStatusWeight=4 deliveryWeight=4 stockLevelWeight=4- 备机侧的BenchmarkSQL的测试配置如下:
db=postgres
driver=org.opengauss.Driver
conn=jdbc:opengauss://20.20.20.104:26000/tpcc?prepareThreshold=1&batchMode=on&fetchsize=10&loggerLevel=off #修改连接字符串, 包含IP、端口号、数据库
user=tpcc #用户名
password=tpcc@123 #密码
warehouses=1000  #仓位数
terminals=100 #并发数
runMins=15  #运行时间
runTxnsPerTerminal=0
loadWorkers=100
limitTxnsPerMin=0
terminalWarehouseFixed=true
newOrderWeight=0
paymentWeight=0
orderStatusWeight=50
deliveryWeight=0
stockLevelWeight=50
如果是测试sysbench,主机读写同时备机只读,那么需要启动2个sysbench客户端分别对主机和备机进行压测
- 主机侧执行读写混合负载
##下述命令中使用的用户名为tpcc,数据库名称为tpcc,用户密码为tpcc@123,数据库端口为26000 [root@localhost]# sysbench --pgsql-password=tpcc@123 --pgsql-port=26000 --report-interval='1' --pgsql-host=20.20.20.103 --tables='8' --db-driver='pgsql' --events='0' --histogram='on' --percentile='95' --threads='512' --table-size='64000000' --time='1200' --pgsql-user=tpcc --rand-type='uniform' --pgsql-db=tpcc oltp_read_write run- 备机侧执行只读测试
##下述命令中使用的用户名为tpcc,数据库名称为tpcc,用户密码为tpcc@123,数据库端口为26000
[root@localhost]# sysbench --pgsql-password=tpcc@123 --pgsql-port=26000 --report-interval='1' --pgsql-host=20.20.20.105 --tables='8' --db-driver='pgsql' --events='0' --histogram='on' --percentile='95' --threads='256' --table-size='64000000' --time='1200' --pgsql-user=tpcc --rand-type='uniform' --pgsql-db=tpcc oltp_read_only run
除了启动2个独立的测试客户端执行测试和新增的配置项外,其余的数据库参数、OS参数、网卡绑中断等配置与单独测试主机相同。
如果是测试sysbench,因为sysbench构造数据的随机性,建议在测试前,在主机和备机侧先将所有数据加载到内存中,以达到最佳测试结果。具体的操作方式可以通过并发执行select命令进行数据的查询来加载。
基于典型生产参数测试
在某些POC测试中,客户希望用数据库的典型生产参数测试,而不是用极限性能参数设置,故这里给出一套典型的生产参数举例。
典型生产参数举例,切换到数据库安装用户下面执行如下命令:
gs_guc set -N all -I all -h "host all all  0.0.0.0/0 sha256"
gs_guc set -N all -I all -c "authentication_timeout=15s"
gs_guc set -N all -I all -c "cstore_buffers = 32MB"
gs_guc set -N all -I all -c "enable_alarm = off"
gs_guc set -N all -I all -c "enable_delta_store = on"
gs_guc set -N all -I all -c "enable_double_write = on"
gs_guc set -N all -I all -c "enable_incremental_checkpoint = on"
gs_guc set -N all -I all -c "enable_wdr_snapshot = off"
gs_guc set -N all -I all -c "enable_xlog_prune = on"
gs_guc set -N all -I all -c "log_min_duration_statement = 1s"
gs_guc set -N all -I all -c "maintenance_work_mem=2GB"
gs_guc set -N all -I all -c "max_connections = 2000"
gs_guc set -N all -I all -c "max_files_per_process = 10000"
gs_guc set -N all -I all -c "max_prepared_transactions = 2000"
gs_guc set -N all -I all -c "modify_initial_password = off"
gs_guc set -N all -I all -c "password_effect_time = 0"
gs_guc set -N all -I all -c "password_lock_time = 0"
gs_guc set -N all -I all -c "password_reuse_time=0"
gs_guc set -N all -I all -c "password_min_digital=1"
gs_guc set -N all -I all -c "password_min_length=8"
gs_guc set -N all -I all -c "password_min_lowercase=1"
gs_guc set -N all -I all -c "password_min_special=1"
gs_guc set -N all -I all -c "password_min_uppercase=1"
gs_guc set -N all -I all -c "password_policy=1"
gs_guc set -N all -I all -c "session_timeout = 0"
gs_guc set -N all -I all -c "shared_buffers = 150GB"
gs_guc set -N all -I all -c "synchronous_commit = on"
gs_guc set -N all -I all -c "temp_buffers = 1GB"
gs_guc set -N all -I all -c "update_lockwait_timeout = 20min"
gs_guc set -N all -I all -c "wal_buffers = 64MB"
gs_guc set -N all -I all -c "wdr_snapshot_interval = 10min"
gs_guc set -N all -I all -c "work_mem = 512MB"
gs_guc set -N all -I all -c "log_temp_files = 100MB"
gs_guc set -N all -I all -c "most_available_sync = ON"
gs_guc set -N all -I all -c "enable_mergejoin = ON"
gs_guc set -N all -I all -c "enable_nestloop = ON"
gs_guc set -N all -I all -c "advance_xlog_file_num = 10"
gs_guc set -N all -I all -c "pagewriter_sleep = 1000ms"
gs_guc set -N all -I all -c "xloginsert_locks = 50"
gs_guc set -N all -I all -c "lockwait_timeout = 20min"
gs_guc set -N all -I all -c "enable_opfusion = off"
gs_guc set -N all -I all -c "max_process_memory=200GB"
gs_guc set -N all -I all -c "log_file_mode = 0755"
gs_guc set -N all -I all -c "audit_enabled=on"
gs_guc set -N all -I all -c "audit_resource_policy=on"
gs_guc set -N all -I all -c "audit_space_limit=10GB"
gs_guc set -N all -I all -c "audit_set_parameter=0"
gs_guc set -N all -I all -c "audit_system_object=524287"
gs_guc set -N all -I all -c "audit_grant_revoke=1"
gs_guc set -N all -I all -c "audit_database_process=1"
gs_guc set -N all -I all -c "audit_user_locked=1"
gs_guc set -N all -I all -c "audit_login_logout=2"
gs_guc set -N all -I all -c "max_size_for_xlog_prune=10GB"
gs_guc set -N all -I all -c "wal_sender_timeout=180s"
gs_guc set -N all -I all -c "wal_receiver_timeout=180s"
gs_guc set -N all -I all -c "log_hostname=off"
gs_guc set -N all -I all -c "instr_unique_sql_count=20000"
gs_guc set -N all -I all -c "track_activity_query_size=10240"
gs_guc set -N all -I all -c "enable_asp=on"
gs_guc set -N all -I all -c "listen_addresses='*'"
gs_guc set -N all -I all -c "wal_keep_segments=640"
gs_guc set -N all -I all -c "pagewriter_sleep=500ms"
gs_guc set -N all -I all -c "bgwriter_delay=1s"
gs_guc set -N all -I all -c "enable_auto_clean_unique_sql=on"
gs_guc set -N all -I all -c "autoanalyze_timeout=1200"
gs_guc set -N all -I all -c "autovacuum_max_workers=10"
gs_guc set -N all -I all -c "autovacuum_naptime=300"
gs_guc set -N all -I all -c "autovacuum_vacuum_threshold=1000"
gs_guc set -N all -I all -c "autovacuum_analyze_threshold=1000"
gs_guc set -N all -I all -c "autovacuum_vacuum_scale_factor=0.05"
gs_guc set -N all -I all -c "autovacuum_vacuum_cost_delay=0"
gs_guc set -N all -I all -c "autovacuum_vacuum_cost_limit=10000"
gs_guc set -N all -I all -c "vacuum_cost_delay=0"
gs_guc set -N all -I all -c "vacuum_cost_limit=10000"
gs_guc set -N all -I all -c "log_lock_waits=on"
gs_guc set -N all -I all -c "wal_level=logical"
gs_guc set -I all -N all -c "enable_segment=on"
gs_guc set -I all -N all -c "recovery_max_workers=4"
gs_guc set -I all -N all -c "local_syscache_threshold=32MB"
gs_guc set -I all -N all -c "idle_in_transaction_session_timeout=3600"
gs_guc set -N all -I all -c "ss_interconnect_channel_count = 32"
gs_guc set -N all -I all -c "ss_work_thread_count = 128"
gs_guc set -N all -I all -c "ss_recv_msg_pool_size = 1GB"
gs_guc set -N all -I all -c "enable_global_syscache = on"
除了上述数据库参数的差异外,其余OS参数、网卡绑中断等配置与极限参数配置下的测试相同。
观察系统资源工具
htop 观察CPU使用情况,arm平台需要从源码编译。
使用htop监控数据库服务端和tpcc客户端CPU利用情况,最佳性能测试情况下,各个业务CPU的占用率都非常高(> 80%)。如果有CPU占用率没有达标,可能是绑核方式不对或其他问题,需要定位找到根因进行调整。
iostat 查看系统IO使用情况。
sar 查看网络使用情况。
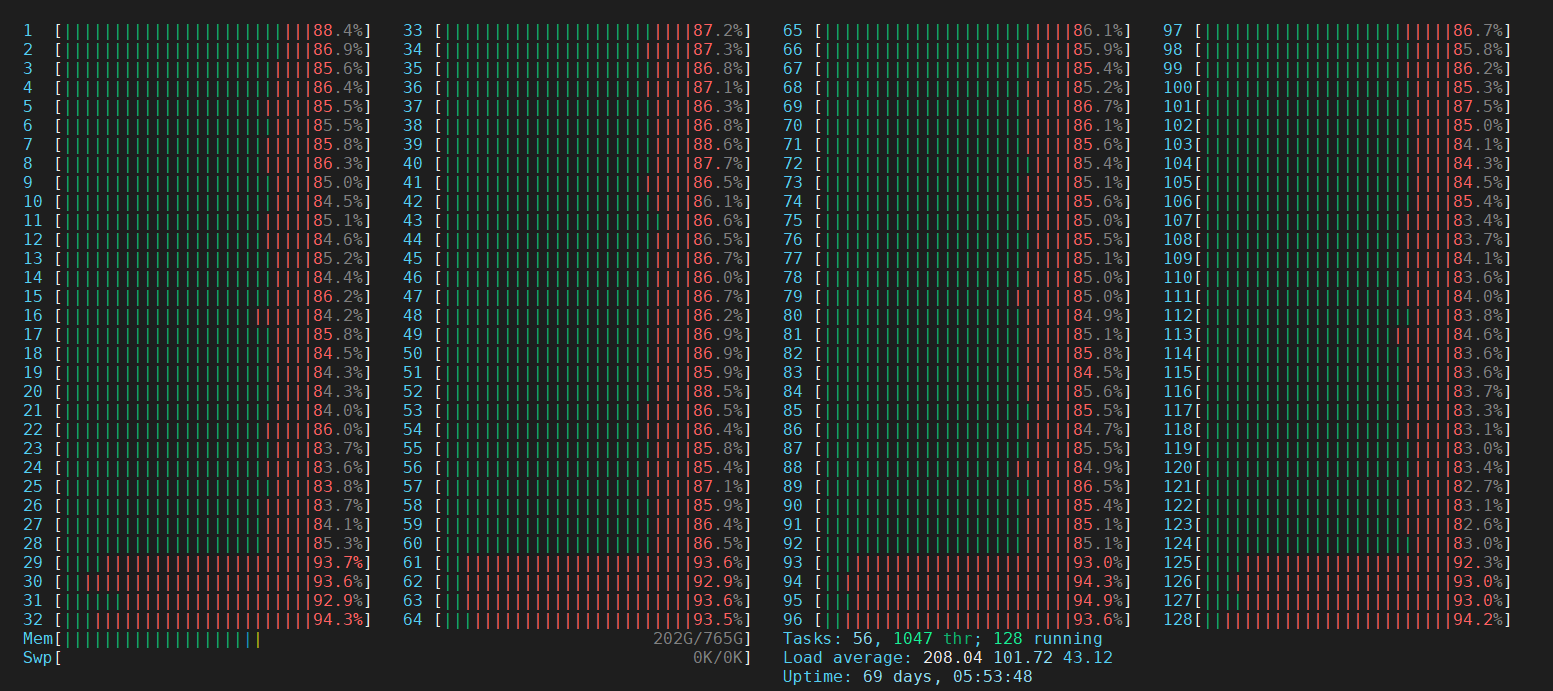
部分数据截图
- 理想情况下,运行压力测试时当数据库htop显示如下。可以看到网卡中断所绑定的CPU核的系统调用较高。数据库使用的CPU核的用户态调用较高。
理想结果
- 在2路鲲鹏128C的服务器+OceanStor Dorado 18000 V6集中式存储的环境上,按上述步骤执行TPCC测试的参考结果如下,测试数据量为1000仓:
| 测试场景 | 测试并发数 | 测试使用参数 | 测试结果 | |||
|---|---|---|---|---|---|---|
| 主机 | 备机 | 主机 | 备机 | 主机(tpmC) | 备机(tpmTOTAL) | |
| 读写 | 空载 | 600 | NA | 极限性能参数 | 120W | NA |
| 读写 | 只读 | 600 | 100 | 极限性能参数 | 97W | 105.1W |
| 读写 | 空载 | 600 | NA | 典型生产参数 | 54W | NA |
| 读写 | 只读 | 600 | 100 | 典型生产参数 | 51.4W | 102.2W |
- 在2路鲲鹏128C的服务器+OceanStor Dorado 18000 V6集中式存储的环境上,按上述步骤执行sysbench测试的参考结果如下,测试数据量为8张表,每张表有64000000记录:
| 测试场景 | 测试并发数 | 测试使用参数 | 测试结果 | |||
|---|---|---|---|---|---|---|
| 主机 | 备机 | 主机 | 备机 | 主机(TPS) | 备机(TPS) | |
| 读写 | 空载 | 512 | NA | 极限性能参数 | 3~3.3W | NA |
| 读写 | 只读 | 512 | 256 | 极限性能参数 | 1.3W | 2.2W |
| 读写 | 空载 | 512 | NA | 典型生产参数 | 1.6~1.9W | NA |
| 读写 | 只读 | 512 | 256 | 典型生产参数 | 8K | 2.1W |