openGauss Database Performance Optimization
openGauss Database Performance Optimization
Overview
This document describes the key system-level optimization configurations required by the openGauss database to achieve optimal database performance on the openEuler OS based on the TaiShan server.
Hardware Specifications
CPU: Kunpeng 920 (Hi1620) ARM AArch64 (64 cores) x 2
Memory: ≥ 512 GB
Disk: NVMe SSD (> 1 TB) x 4
NIC: 1822 10GE NICEthernet controller: Huawei Technologies Co., Ltd. Hi1822 Family (4*25GE) (rev 45)
Software Specifications
OS: openEuler 20.03 (LTS)
Database: openGauss 1.0.0
Benchmark: benchmarksql-5.0
JDK: jdk1.8.0_212
Ant: apache-ant-1.9.15
The following optimizes the database by configuring BIOS, operating system, file system, network, core binding, and constructing TPCC test data. - Third-party tool: JDK ant benchmark- Linux tool: htop iostat
For details about how to install and use the benchmark htop iostat tool, see Benchmark Usage. (https://opengauss.org/zh/blogs/blogs.html?post/optimize/opengauss-tpcc/)
BIOS Settings
Log in to a server management system, restart a server, enter the BIOS screen, modify BIOS settings, and restart the server. (The server management system depends on the actual situation.)
- After the machine self-check, startup options are displayed.
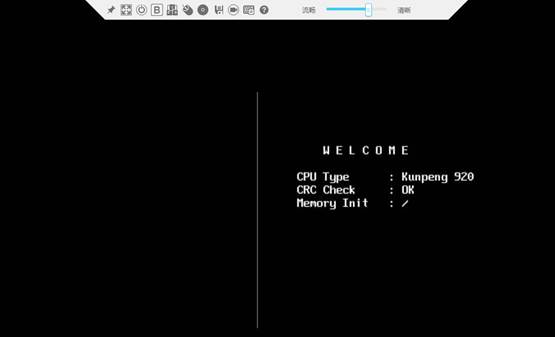
- Press Del to enter the BIOS screen.
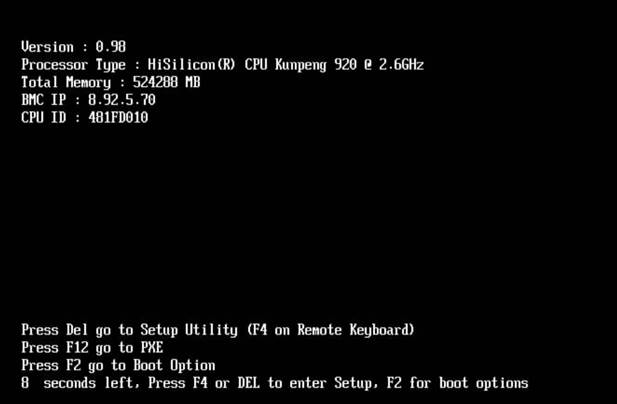
- Enter the BIOS password.

- Restore to factory settings.
Press F9 to restore to the factory settings. It is recommended that you restore to the factory settings first because many default BIOS settings may have been changed.
**5. **Modify BIOS settings.
The modification includes:
# Choose BIOS > Advanced > MISC Config and set Support Smmu to Disabled.
# Choose BIOS > Advanced > MISC Config and set CPU Prefetching Configuration to Disabled.
# Choose BIOS > Advanced > Memory Config and set Die Interleaving to Disable.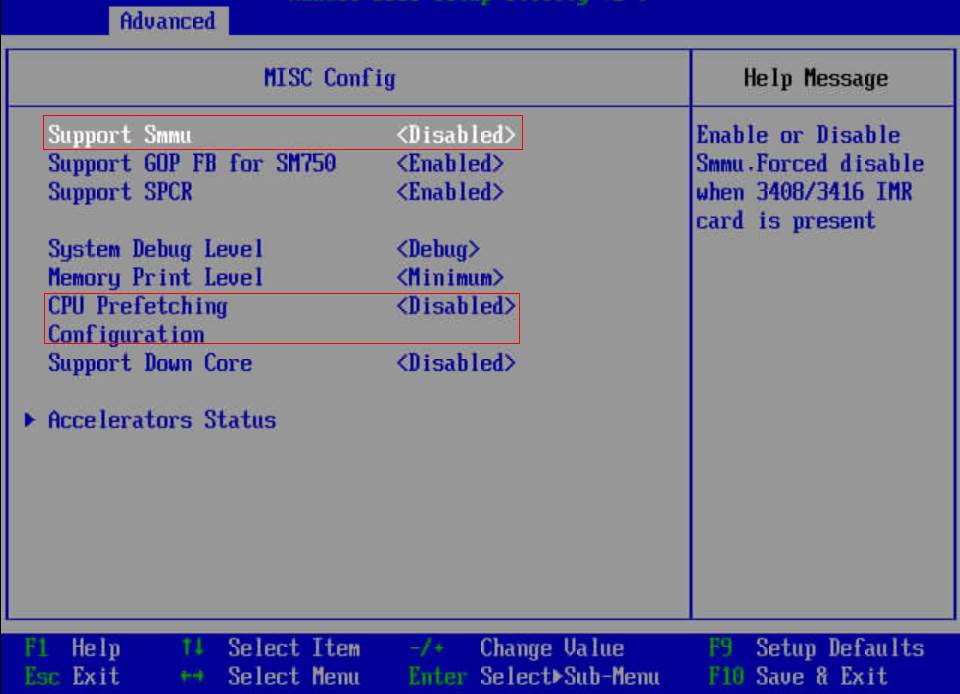
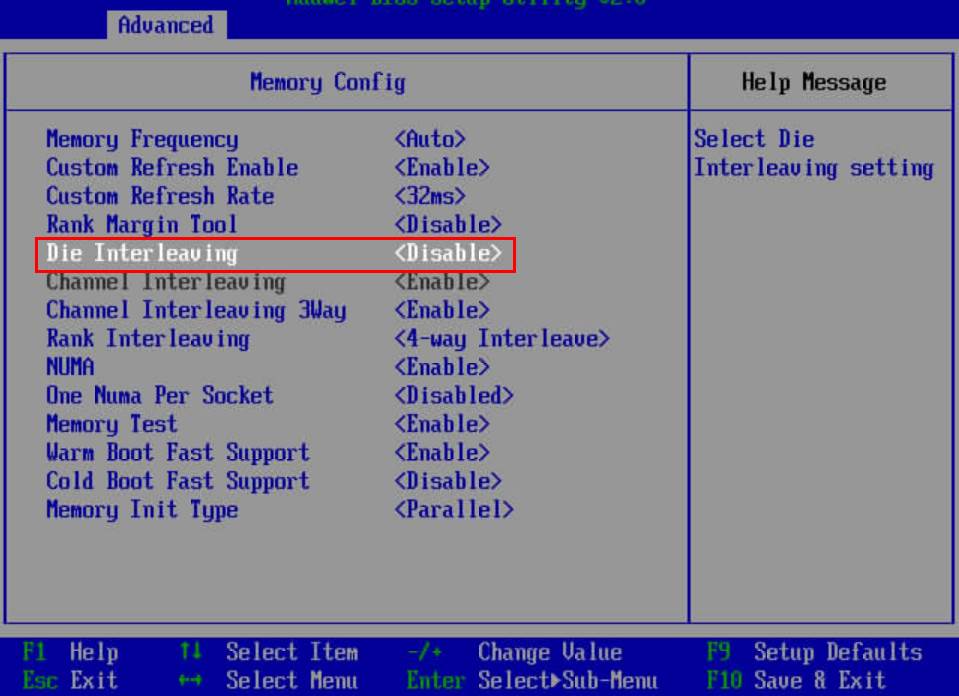
**6. **Save the BIOS settings and restart the server.
Press F10 to save the settings and exit. Restart the system.
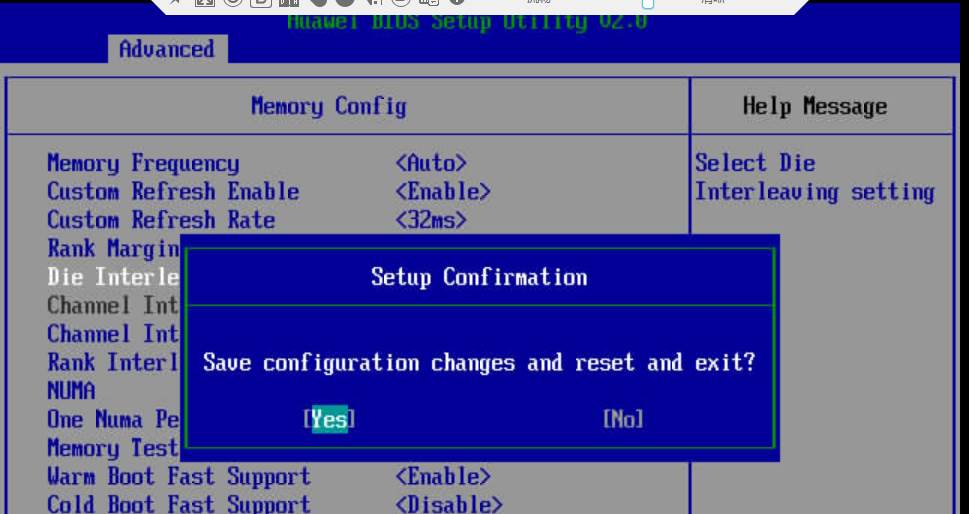
OS Configuration
Optimizing OS Configuration
irqbalance disabled: If a GaussDB process and a client preempt CPU resources, the CPU usage is unbalanced. If the htop shows that some CPUs are overloaded and some are idle, check whether irqbalance is disabled.
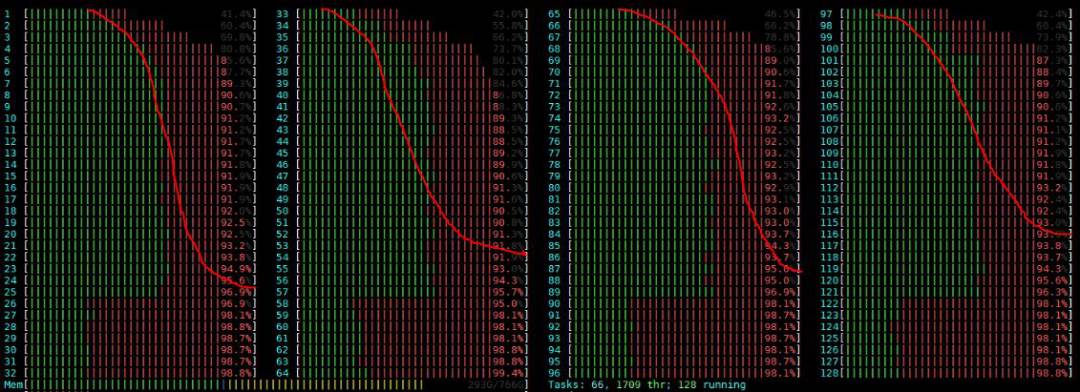
service irqbalance stop
echo 0 > /proc/sys/kernel/numa_balancing
echo 'never' > /sys/kernel/mm/transparent_hugepage/enabled
echo 'never' > /sys/kernel/mm/transparent_hugepage/defrag
echo none > /sys/block/nvme*n*/queue/scheduler  ## Setting the I/O queue scheduling mechanism for NVMe drives
File System Configuration
Change the block size of the XFS file system to 8 KB.
(1) Check the existing block sizes of the mount points corresponding to the NVMe drives. Run the following command to check the NVMe drives that are mounted:
df -h | grep nvme
/dev/nvme0n1      3.7T  2.6T  1.2T  69% /data1
/dev/nvme1n1      3.7T  1.9T  1.8T  51% /data2
/dev/nvme2n1      3.7T  2.2T  1.6T  59% /data3
/dev/nvme3n1      3.7T  1.4T  2.3T  39% /data4
You can run the xfs_info command to view information about the NVMe drives.
xfs_info /data1

In the preceding figure, the block size is 8 KB and does not need to be changed. If the data block size is not 8 KB, back up and format the data.
(2) Back up the data on the disk to be formatted.
Back up the required data to other disks or machines as required.
(3) Format the disk and set the block size to 8 KB.
Take the /dev/nvme0n1 disk and the /data1 mount point as an example. The commands are as follows:
umount /data1
mkfs.xfs -b size=8192 /dev/nvme0n1 -f
mount /dev/nvme0n1 /data1
(4) Run the xfs_info command again to check whether the block size is set correctly.
Network Configuration
**1. **Multi-Queue Interrupt Settings
As TaiShan servers have a large number of cores, NIC multi-queues need to be configured on servers and clients. The recommended configuration is as follows: 16 interrupt queues are configured for NICs on servers, and 48 interrupt queues are configured for NICs on clients.
Multi-queue Interrupt Setting Tool (1822-FW)
You can obtain the released Hi1822 NIC version from the following link: https://support.huawei.com/enterprise/en/intelligent-accelerator-components/in500-solution-pid-23507369/software. IN500 solution 5.1.0.SPC401 and later versions support multi-queues.
(1) Decompress Hi1822-NIC-FW.zip, go to the directory, and install hinicadm as user root.

(2) Determine the NIC to which the currently connected physical port belongs. The network port and NIC name vary according to the hardware platform. In the following example, the private network port enp3s0 is used and belongs to the hinic0 NIC.
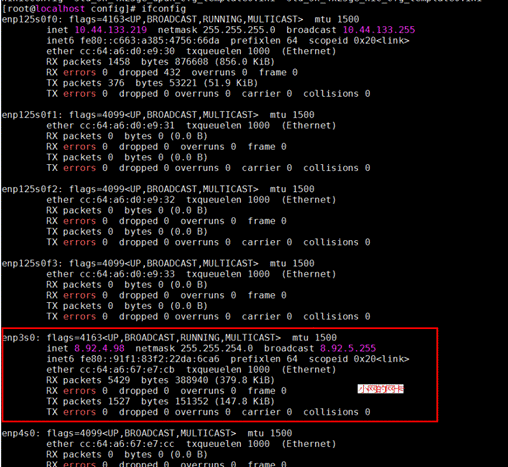
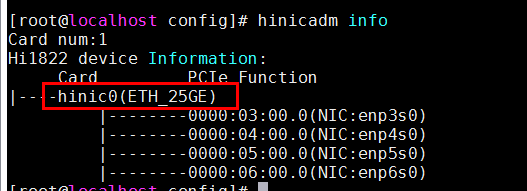
(3) Go to the config directory and use the hinicconfig tool to configure the interrupt queue firmware configuration file.
64-queue configuration file: std_sh_4x25ge_dpdk_cfg_template0.ini;
16-queue configuration file: std_sh_4x25ge_nic_cfg_template0.ini;
Set the number of queues for hinic0 to different values. (The default value is 16 and it can be changed as needed.)
./hinicconfig hinic0 -f std_sh_4x25ge_dpdk_cfg_template0.ini
Restart the OS for the modification to take effect. Run the ethtool -l enp3s0 command to view the result. In the following figure, 32 is displayed.
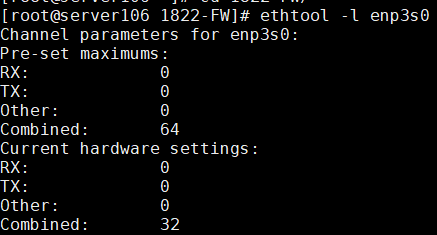
Run the ethtool -L enp3s0 combined 48 command to change the value of combined. (The optimized value varies according to the platform and application. For the 128-core platform, the optimized value on the server is 16 and that on the client is 48.)
**2. **Interrupt Tuning
When the openGauss database is fully loaded (the CPU usage is greater than 90%), the CPU becomes the bottleneck. In this case, offload network slices to NICs.
ethtool –K enp3s0 tso on
ethtool –K enp3s0 lro on
ethtool –K enp3s0 gro on
ethtool –K enp3s0 gso on
Take the 1620 platform as an example. The NIC interrupts are bound to the last four cores on each NUMA node, and each core is bound to three interrupts. The core binding interrupt script is as follows. This script is called by gs_preinstall during the openGauss installation. For details, see the product installation guide.

sh bind_net_irq.sh 16**3. **Confirming and Updating the NIC Firmware
Check whether the firmware version of the private NIC in the current environment is 2.5.0.0.
ethtool -i enp3s0
driver: hinic
version: 2.3.2.11
firmware-version: 2.5.0.0
expansion-rom-version:
bus-info: 0000:03:00.0
If the version is 2.5.0.0, you are advised to replace it with 2.4.1.0 for better performance.
NIC Firmware Update Procedure
(1) Upload the NIC firmware driver to the server. The firmware file is Hi1822_nic_prd_1h_4x25G.bin.
(2) Run the following command as user root:
**hinicadm updatefw -i <Physical NIC device name> -f **<Firmware file path>
Physical NIC device name indicates the NIC name in the system. For example, hinic0 indicates the first NIC, and hinic1 indicates the second NIC. For details about how to query the NIC name, see "Multi-Queue Interrupt Settings." For example:
# hinicadm updatefw -i <Physical NIC device name> -f <Firmware file path>
Please do not remove driver or network device
Loading...
[>>>>>>>>>>>>>>>>>>>>>>>>>>>>>>>>>>>>>>>>>>>>>>>>>>]  [100%] [\]
Loading firmware image succeed.
Please reboot OS to take firmware effect.
(3) Restart the server and check that whether the firmware version of the private NIC is updated to 2.4.1.0.
ethtool -i enp3s0
driver: hinic
version: 2.3.2.11
firmware-version: 2.4.1.0
expansion-rom-version:
bus-info: 0000:03:00.0
The firmware version of the private NIC is successfully updated.
Core Binding on the Database Server and Client
Install the database by referring to the openGauss installation document.
The general procedure is as follows:
◾ Stop a database.
◾ Modify postgresql.conf parameters.
◾ Start the database in core binding mode by running the numactl --interleave=all bin/gaussdb -D ${DATA_DIR} --single_node command.
◾ Start the benchmark in core binding mode by running the numactl -C 0-19,32-51,64-83,96-115 ./runBenchmark.sh props.pg command.
Run the preceding command based on the core binding configuration and benchmark configuration file. Cores bound to the benchmark are different from cores bound to the database.
**1. **Core Binding Settings on the Server
(1) During the running of service processes, the network interruption reported by the hardware causes frequent context switching, which severely affects the efficiency. Therefore, the network interruption and services must be bound to different cores. For details about the core binding for network interruption, see the previous section.
(2) The thread pool mechanism is introduced in openGauss. When the database is started, the thread pool creates a specified number of threads to provide services. When a thread is created, it is bound to a core. Therefore, the core binding information of the NIC needs to be transferred through the GUC parameter, to facilitate core binding configuration during system running. The following figure shows the parameters when 128 cores are used.

Total number of threads = (Number of CPUs – Number of CPUs processing the network) x Number of threads per core (7.25 is recommended) = (128 – 16) x 7.25 = 812. The number of NUMA nodes is 4, and the number of cores for processing interrupts is 16.
The following is an example of CPU binding for auxiliary allocation:
numactl -C 0-27,32-59,64-91,96-123 gaussdb --single_node -D {DATA_DIR} -p {PORT} &Or
numactl --interleave=all gaussdb --single_node -D {DATA_DIR} -p {PORT} &**2. **Server Parameter Setting
The - advance_xlog_file_num = 10 parameter is added to the postgresql.conf file.
This parameter indicates that the background thread BackgroundWALWriter periodically checks and initializes the next 10 XLogs in advance to avoid initializing XLogs only when transactions are committed, reducing the transaction commit delay. This parameter is valid only in the performance pressure test. Generally, you do not need to set this parameter. The default value is 0, indicating that no initialization is performed in advance. - numa_distribute_mode = 'all'
This parameter can be set to all or none. The value all indicates that NUMA optimization is enabled. Working threads and corresponding PGPROC and WALInsertlock are grouped and bound to corresponding NUMA nodes to reduce CPU remote memory access on key paths. The default value is none, indicating that the NUMA distribution feature is disabled. It is used only when multiple NUMA nodes are involved and the cost of remote fetch is obviously higher than that of local fetch. You are advised to enable this function during performance pressure tests.
thread_pool_attr configuration:
thread_pool_attr = '812,4,(cpubind: 0-27,32-59,64-91,96-123)'
Parameter description:
max_connections = 4096
allow_concurrent_tuple_update = true
audit_enabled = off
checkpoint_segments = 1024
checkpoint_timeout = 15min
cstore_buffers = 16MB
enable_alarm = off
enable_codegen = false
enable_data_replicate = off
full_page_writes = on
max_files_per_process = 100000
max_prepared_transactions = 2048
shared_buffers = 350GB
use_workload_manager = off
wal_buffers = 1GB
work_mem = 1MB
log_min_messages = FATAL
transaction_isolation = 'read committed'
default_transaction_isolation = 'read committed'
synchronous_commit = on
fsync = on
maintenance_work_mem = 2GB
vacuum_cost_limit = 2000
autovacuum = on
autovacuum_mode = vacuum
autovacuum_max_workers = 5
autovacuum_naptime = 20s
autovacuum_vacuum_cost_delay = 10
xloginsert_locks = 48
update_lockwait_timeout = 20min

enable_mergejoin = off
enable_nestloop = off
enable_hashjoin = off
enable_bitmapscan = on
enable_material = off

wal_log_hints = off
log_duration = off
checkpoint_timeout = 15min
autovacuum_vacuum_scale_factor = 0.1
autovacuum_analyze_scale_factor = 0.02
enable_save_datachanged_timestamp = false

log_timezone = 'PRC'
timezone = 'PRC'
lc_messages = 'C'
lc_monetary = 'C'
lc_numeric = 'C'
lc_time = 'C'

enable_thread_pool = on
thread_pool_attr = '812,4,(cpubind:0-27,32-59,64-91,96-123)'
enable_double_write = off
enable_incremental_checkpoint = on
enable_opfusion = on
advance_xlog_file_num = 10
numa_distribute_mode = 'all'

track_activities = off
enable_instr_track_wait = off
enable_instr_rt_percentile = off
track_counts = on
track_sql_count = off
enable_instr_cpu_timer = off

plog_merge_age = 0
session_timeout = 0

enable_instance_metric_persistent = off
enable_logical_io_statistics = off
enable_page_lsn_check = off
enable_user_metric_persistent = off
enable_xlog_prune = off

enable_resource_track = off
instr_unique_sql_count=0
enable_beta_opfusion=on
enable_beta_nestloop_fusion=on
**3. **Configuring Core Binding for the TPC-C Client
The client uses numactl to bind the client to cores except the NIC. The following figure uses a 128-core environment as an example. A total of 80 cores are used to process service logic, and the remaining 48 cores are used to process network interruption.
The corresponding tpmC program is as follows:
numactl -C 0-19,32-51,64-83,96-115 ./runBenchmark.sh props.pgOther cores are used to process network interruptions.
Constructing TPC-C Initial Data
**1. **Modify benchmark configurations.
Copy props.pg and rename it props.opengauss.1000w. Edit the file and replace the following configuration in the file:
cp props.pg props.opengauss.1000w
vim props.opengauss.1000w
db=postgres
driver=org.postgresql.Driver
// Modify the connection string, including the IP address, port number, and database.
conn=jdbc:postgresql://ip:port/tpcc1000?prepareThreshold=1&batchMode=on&fetchsize=10
// Set the user name and password for logging in to the database.
user=user
password=******

warehouses=1000
loadWorkers=200

// Set the maximum number of concurrent tasks, which is the same as the maximum number of work tasks on the server.
terminals=812
//To run specified transactions per terminal- runMins must equal zero
runTxnsPerTerminal=0
//To run for specified minutes- runTxnsPerTerminal must equal zero
runMins=5
//Number of total transactions per minute
limitTxnsPerMin=0

//Set to true to run in 4.x compatible mode. Set to false to use the
//entire configured database evenly.
terminalWarehouseFixed=false

//The following five values must add up to 100
//The default percentages of 45, 43, 4, 4 & 4 match the TPC-C spec
newOrderWeight=45
paymentWeight=43
orderStatusWeight=4
deliveryWeight=4
stockLevelWeight=4

// Directory name to create for collecting detailed result data.
// Comment this out to suppress.
resultDirectory=my_result_%tY-%tm-%td_%tH%tM%tS
osCollectorScript=./misc/os_collector_linux.py
osCollectorInterval=1
// Collect OS load information.
//osCollectorSSHAddr=osuer@***.***.***.***
//osCollectorDevices=net_enp3s0 blk_nvme0n1 blk_nvme1n1 blk_nvme2n1 blk_nvme3n1
**2. **Prepare for importing TPC-C data.
(1) Replace the tableCreats.sql file.
Download the tableCreates.sql file. Use this file to replace the corresponding file in benchmarksql-5.0/run/sql.common/ of the benchmark SQL.
The file is modified as follows:
◾ Two tablespaces are added.
CREATE TABLESPACE example2 relative location 'tablespace2';
CREATE TABLESPACE example3 relative location 'tablespace3';
◾ The bmsql_hist_id_seq sequence is deleted.
◾ The FACTOR attribute is added to each table.
create table bmsql_stock (
  s_w_id       integer       not null,
  .....
  s_dist_10    char(24)
) WITH (FILLFACTOR=80) tablespace example3;
(2) Modify the indexCreates.sql file.
Modify the run/sql.common/indexCreates.sql file.
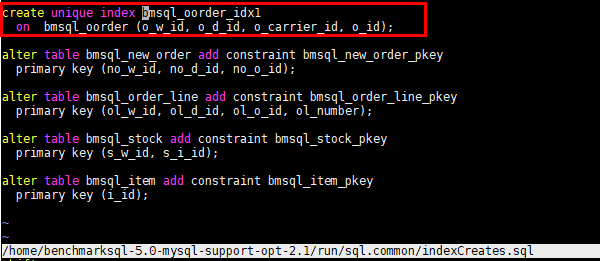
Modify the content in the red box in the preceding figure as follows:
Add the content in red in the following figure to the file so that the data can be automatically generated in different data tablespaces when the benchmark tool automatically generates data. If the content is not added, modify the data in the database after the benchmark tool generates data for disk division.

(3) Modify the runDatabaseBuild.sh file. Modify the content in the following figure to avoid unsupported foreign keys during data generation.
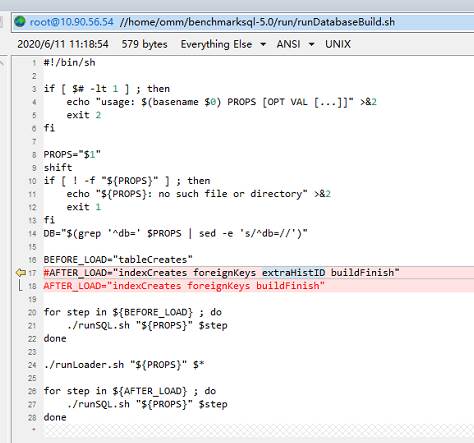
**3. **Import data.
Execute runDatabaseBuild.sh to import data.
**4. **Back up data.
To facilitate multiple tests and reduce the time for importing data, you can back up the exported data. A common method is to stop the database and copy the entire data directory. The reference script for restoration is as follows:
#!/bin/bash
rm -rf /ssd/omm108/gaussdata
rm -rf /usr1/omm108dir/tablespace2
rm -rf /usr2/omm108dir/tablespace3
rm -rf /usr3/omm108dir/pg_xlog
cp -rf /ssd/omm108/gaussdatabf/gaussdata /ssd/omm108/ &
job0=$!
cp -rf /usr1/omm108dir/tablespace2bf/tablespace2 /usr1/omm108dir/ &
job1=$!
cp -rf /usr2/omm108dir/tablespace3bf/tablespace3 /usr2/omm108dir/ &
job2=$!
cp -rf /usr3/omm108dir/pg_xlogbf/pg_xlog /usr3/omm108dir/ &
job3=$!
wait $job1 $job2 $job3 $job0
**5. **Partition data disks.
During the performance test, data needs to be distributed to different storage media to increase the I/O throughput. The data can be distributed to the four NVMe drives on the server. Place the pg_xlog, tablespace2, and tablespace3 directories on the other three NVMe drives and provide the soft link pointing to the actual location in the original location. pg_xlog is in the database directory, and tablespace2 and tablespace3 are in the pg_location directory. For example, run the following commands to partition tablespace2:
mv $DATA_DIR/pg_location/tablespace2 $TABSPACE2_DIR/tablespace2
cd $DATA_DIR/pg_location/
ln -svf $TABSPACE2_DIR/tablespace2 ./
**6. **Run the TPC-C program.
numactl –C 0-19,32-51,64-83,96-115 ./runBenchmark.sh props.opengauss.1000w**7. **Monitor performance.
Use htop to monitor the CPU usage of the database server and TPC-C client. In the extreme performance test, the CPU usage of each service is greater than 90%. If the CPU usage does not meet the requirement, the core binding mode may be incorrect and needs to be adjusted.
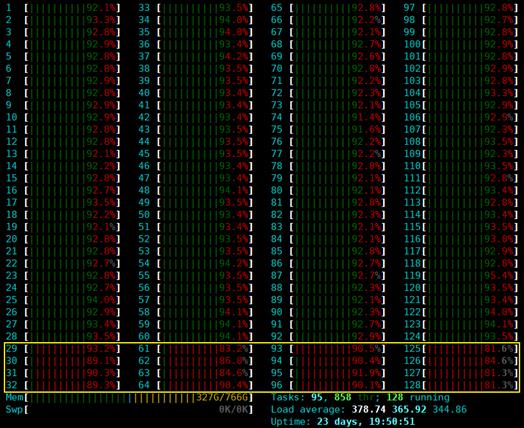
In the preceding figure, the CPU in the yellow box is used to process network interruption.
**8. **View the monitoring status after tuning.
The htop state after tuning is reliable.

Database tuning is a tedious task. You need to continuously modify configurations, run TPC-C, and perform commissioning to achieve the optimal performance configuration.
TPC-C running result:
